• Home
  • Cinematography
  • Photography
  • Rob-O-Blog
  • Contact

How Do You Light a 5 Million Dollar Interview?

10/24/2012

5 Comments

 
I just watched Trump's 5 million dollar youtube video challenge. You know the one challenging Obama to give up some documents in exchange for Donald Trump's scribbles on a piece of paper to the tune of 5 million bucks (and to Obama's favorite charities no less!!). The lighting in that video was, well, pukey. It stunk. You would think that Don Trump could afford better. He's no slump! Heck, he could have called in a few favors from his reality TV co-horts. Well, this lesson goes specifically out to that camera guy or gal who shot that horribly lit youtube video. You're Fired! Here is how you might light an interview on your next gig:

Overview:
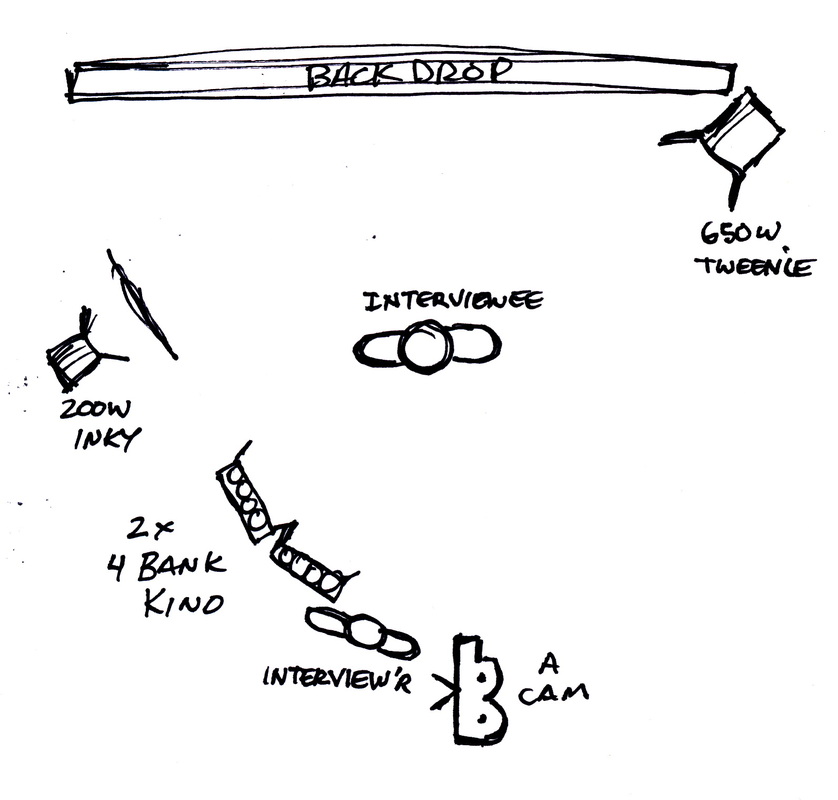
Here is a top down view of the overall lighting set up. You can see I used four lights, one cookie(or cuculoris) and one camera. The interviewer sits just left of the camera so the interviewee is not looking directly into the camera. This is best for most documentaries, unless you want to directly address your audience in the way that D-Trump did. For this interview I used my 650 watt Tweenie for the backlight, a 200 watt Inky and a cookie for the pattern on the backdrop and (2) 4 foot, 4 bank tungsten balanced kinos. The Kinos are my key light. In this set up I have not fill light to the right of the camera, which is a personal style choice. In my opinion it gives a bit more of a 'hard' modern look....the fill light would soften it up in my humble opinion so it's out!
Picture
Part 1: Backlight
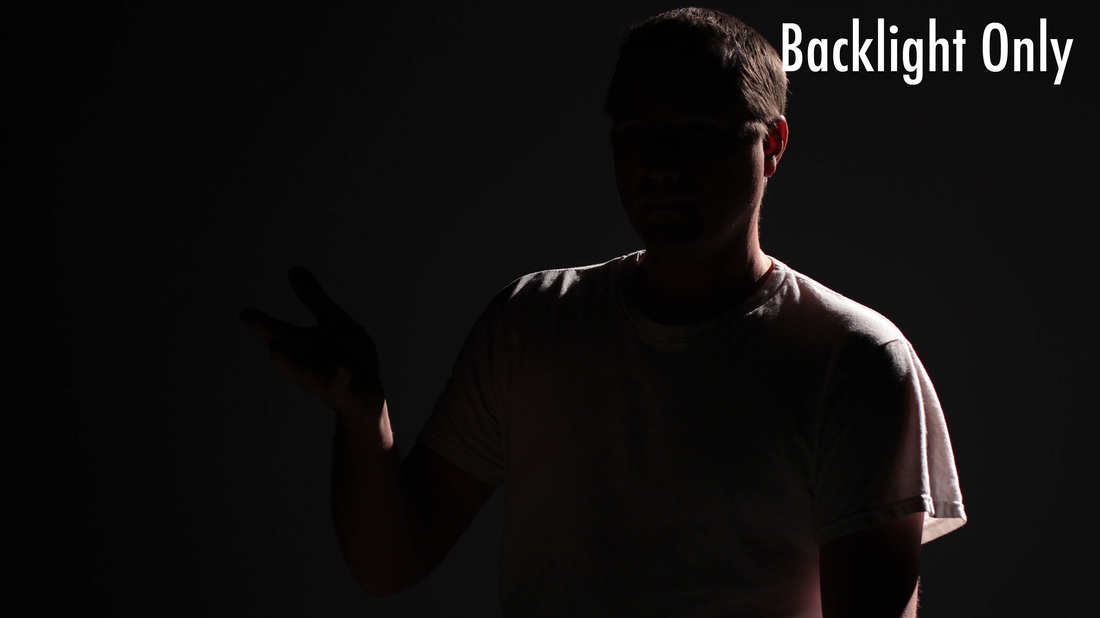
Before I get into the backlight, one thing I like to work hard to do is control the light. My little studio is essentially light proof, no light gets in with out me knowing about it. That way i can control the amount of light and the color temperature so that it looks the same in every take (even if the interview took all day or night to shoot). Ok, so...the backlight. Pretty simple. I used a 650 watt tungsten balanced Mole Richardson Tweenie set up high and in the back corner opposite the key light (we'll get into the in a minute). I didn't use a dimmer, so this puppy is full blast. No scrims or diffusion either. You could use them if you wanted to. I like to set my back light first, some people like to set the key light first. It is just a matter of preference. Enough of my yammering....take a look at the picture below, it will show you what the light set up should look like. 
Picture
Part 2: Backdrop light and Cuculoris (cookie)
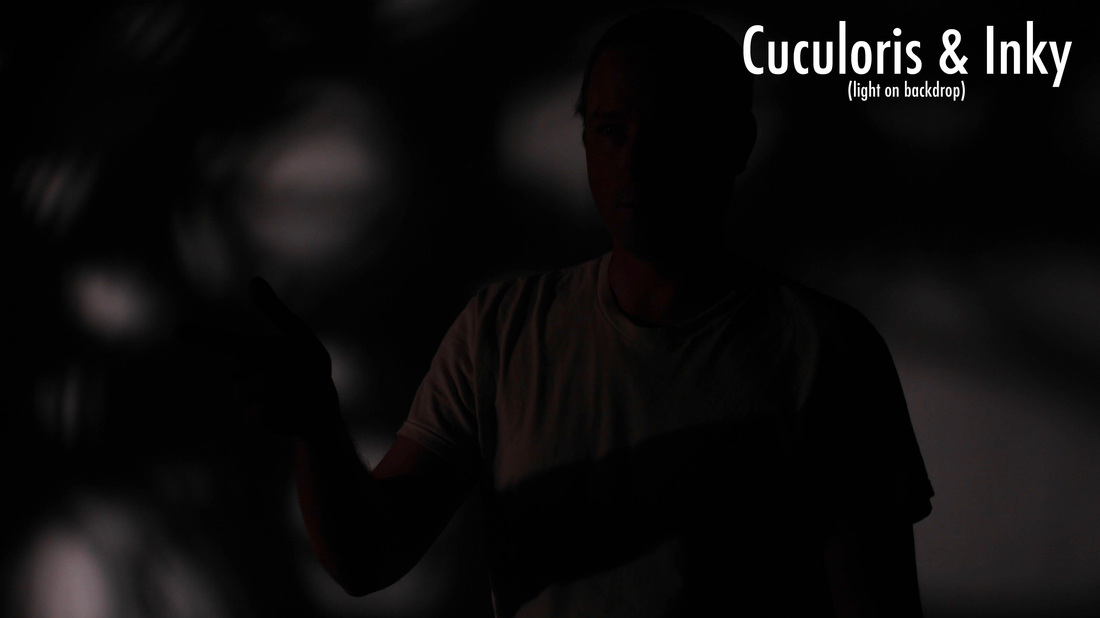
Next I set up my little Inky. It's a small 200 watt Mole Richardson tungsten light with a fresnel lens.  I LOVE this light, I can put this little bad boy anywhere! It's small, lite and can throw a beam pretty far. I set this little guy on a stand at about chest height and set up my cookie in front of it on a C-Stand also. There is no gel or diffusion on the front of the Inky, just bare bulb and the fresnel lens. I messed with the focus of the light until I was happy. See below:
Picture
Part 3: Key light
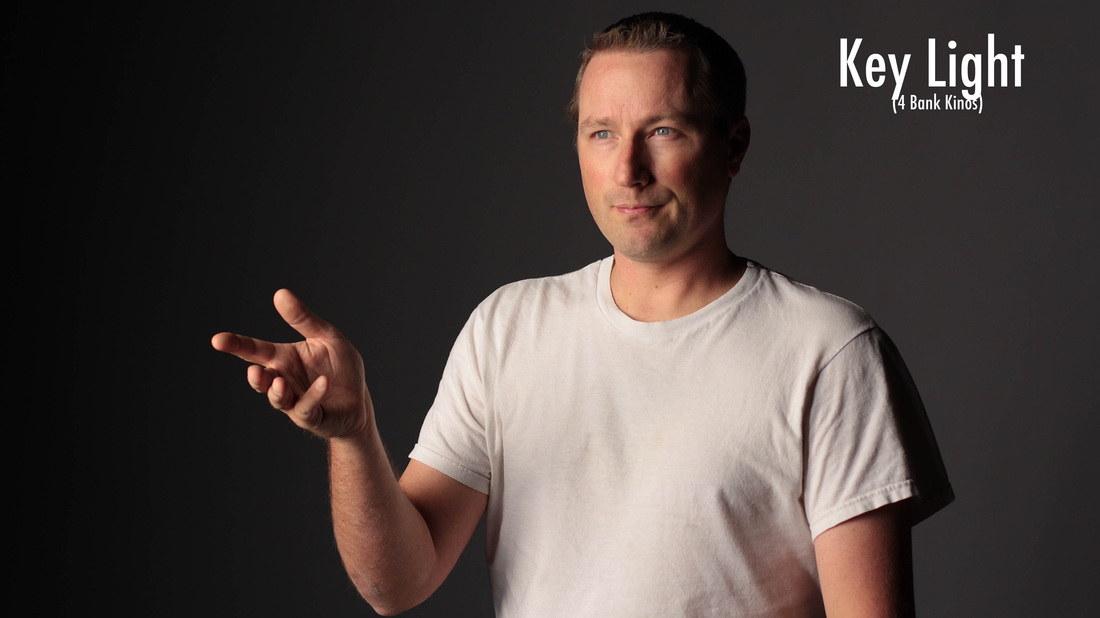
As you can see from the picture below, the key light is a pretty darn important light. It's position is pretty important too and informs the emotion of the interview. Usually, the key light is pretty close to where the camera is located, in this instance, I moved it over about 5 feet from the camera. My intent is to see more of the side of the head of the interviewee while his face is pointed more into the light during the interview. It is almost a 3/4 view of the interviewee, which I like. Kino's kick butt and you could light the interview with just these, I mean, heck, it looks pretty good - if I do say so myself ;) . 
Picture
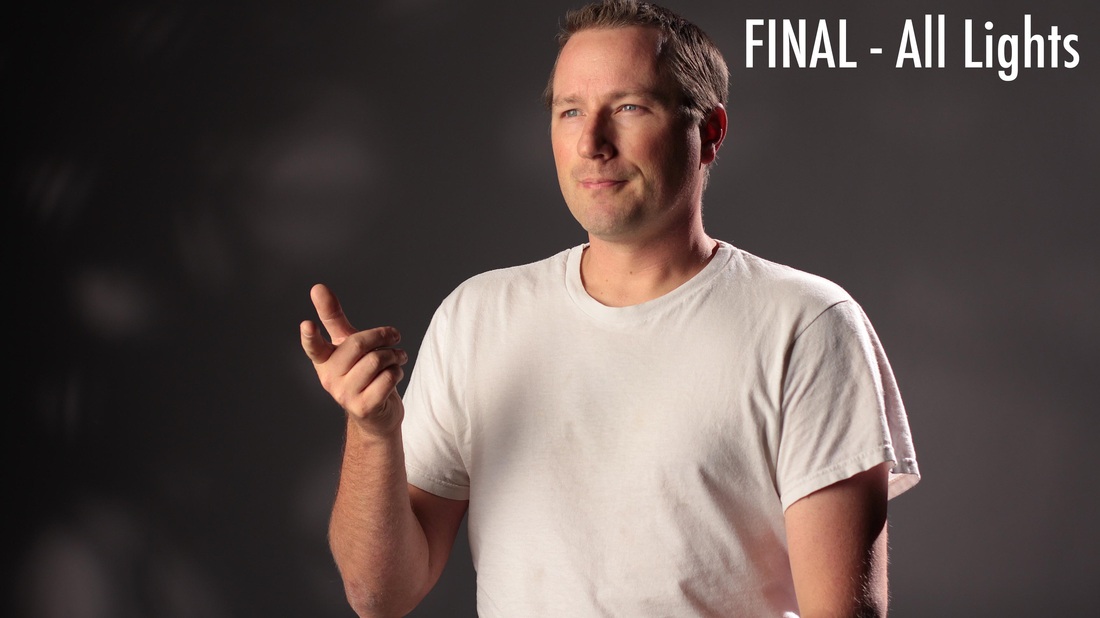
Part 4: Putting it all together
Boom, that's it. Once you have all of your lights set, turn 'em on and set your interviewee down. Get your final camera framing and set your focus. That is also where the Trump video failed. FOCUS. The video was a little soft. Hey Trumpster, for your next video, dump your current Trump video chump and give me a call. I'll do it for free (provided you pay my airfare to the big apple).


Picture
5 Comments

It's Time to Meet Your Maker

1/1/2012

2 Comments

 
I've always enjoyed the craft of making things myself, DIY as it has been called: "Do It Yerself". The term 'DIY' is soooo mid 90's though, these days creative crafty people are called "Makers". Makers unite! While making may not always be fun (frustration sets in when things don't go as planned) , it certainly can be rewarding especially knowing that you have created something unique that no one else has, thus avoiding those awkward moments at the prom and hiding in the bathroom. Well, we are not taking a trip back in time to the prom, but I do want to attempt to inspire you to make something new out of something old or just create something that is unique to you and is hopefully useful too.

I wanted to make a usefully cool camera strap that didn't advertise the name of my camera on it. I looked on line to find unique camera straps, but most of them are too expensive, even the vintage retro ones (especially those!). The following camera strap that I made cost me $3 and my time.
Picture
Step one: Locate your strap 'base'. I found a thick but soft canvas belt at a thrift store that would work. I liked the olive color and it was comfy around my neck. Some other cool items that I saw where studded belts and retro neckties.

Step two: Lose the metal….I cut the janky "belt buckle" off and decided to make some holes for eyelets that my camera straps would go through.
Picture
Step three: Add eyelets….this was actually a style choice for me. I could have just as easily sewed the camera straps to the former belt. I had the eyelet kit from a previous job making a tarp. I picked it up at harbor freight tools for $7.
Picture
The two piece eyelets and the stamp tool.
Picture
Eyelets in place.
Step four: I cut some old nylon camera straps from a old camcorder strap that I had lying around. You may need to find some narrow nylon straps at a fabric store or get an old hi8 camcorder strap from the thrift store.

Step five: You can sew by hand or use your moms machine, but you will need to stitch up the ends of the old belt so they don't fray too much…you may want a little fray to add to the worn look of the strap. 

Step six: Loop the nylon camera straps through the eyelets and sew them with a machine really well. Test out the strength of the straps by tying them to your kids ankles and swing them around the room a bit. Then you know for sure that they will safely hold your camera. 
Picture
Your done! Now Joe Blow on the street wont be able to stroll up to you and read your strap and flex knowledge: "Awh…I see you have a Canon, is that the AE-1?". Now you can put them to the test and sort the wanna-be's from the true photogs.
Hey Maker! Pat yourself on the back!
2 Comments

Rev. Swaggart Picks Up a Date

12/22/2011

2 Comments

 
Drove down to Indio today to pursue an elongated penny squisher. Remember those things? Well, I am slightly embarrased to say that I am not so fanatically collecting them. It's actually a very half hearted effort. The way that I see it: it gets me out, gets me to a place that I may not have otherwise gone to. Today it took me down to my friends at Clark Travel Plaza just off of old route 99. Clarks is famous for an event that took place in 1991 where Rev. Jimmy Swaggart picked up a "date" and got busted for it...they even made an squished penny out of it (see below). I don't know if an event like this makes a place famous, since it is very likely that since event was 20 years ago no one remembers who Jimmy Swaggart is anyway. All fame aside, Clarks has got it all: Gas, food, car wash, racing gas, old signs, a penny squisher, a mural, history and of couse the Swaggart thing.  It's not much to look at photographically, but the penny squisher got me down here, so I may as well look around a bit. Just down the street is a cool old hotel called the Tropics Motor Hotel, very cool signage. Downtown Indio provided me with some cool shots of an old taco stand and 3 thrift stores in one city block! I am liking this place so far. But as night began to fall, I felt less and less like I should be hanging around shooting pics with $4K worth of camera gear in my hand that could be easily snatched. So I got my shots and I shot right out of there....nice place to take pics, but I dont want to live there.
Picture
Tropics Motor Hotel on Rt 99
Picture
The first elongated penny reads: "Rev Jimmy Swaggart picked up a date at Clark's 10-3-91" The second is the rt99 historic penny.
Picture
Vintage Signage at Clark's in Indio
Picture
Former taco stand old town Indio. Was this a white castle?
2 Comments

7 Things Beginning Photographers Should Do

8/5/2011

1 Comment

 
I thought I would post this blog because I had just been asked for some advice by a friend who is just starting to get into photography. I am no major professional photographer, no guru,  not making too much money at it and don't claim to have 'arrived'. However, if I had it all to do over again, I would do these 7 things:
  1. Just start shooting. Take whatever camera you have and just get out there and start shooting things. Whether you have a point and shoot camera, a plastic 35mm throwaway camera or a cell phone, just start taking pics and see what you get.
  2. Hold off on any “education”. Just get out there and see where it takes you. It is sort of a talent check. See what kind of raw talent you may have. Don't let yourself get tainted by following the “rules of photography”. Do this for a few months, you probably hit a wall and start getting hungry to expand your technical skills. Then check out some higher learning.
  3. Get a manual camera. Get a camera that you can change the settings on. ISO, f stop and shutter speed. Don't spend too much cash when you first get started, there are plenty of really good used semi pro cameras out there for low prices, especialy if you get one that does not have video capabilities.
  4. Shoot one camera, one lens. When you first get started it is good to just stick to one piece of equipement so that you can get to know it inside and out. When you are not focusing on the equipment it helps you to focus more on creativity, you are allowing yourself to spend a bit more time thinking about composition and your subject. Using one camera and one lens allows you to get to know the sweet spot and or limitations of your equipment and let your creativity flow.
  5. Start shooting what is around you. Find local spots, parks, historical places and friends. No need to go too far to find that crazy unique spot. Make your ordinary spot unique.
  6. Learn from others. When you are ready to expand your knowledge base on the 'finer' points of photography, find a mentor that can help and encourage you in your new endeavor. Other places to learn: Youtube, vimeo, photography.com, and trade magazines.
  7. Shoot everyday. Take at least one photograph everyday. Just get out there and do it. I read somewhere that it takes 10,000 hours of practice before a person reaches the level where you would be considered professional or the equivalent.
Well there you have it some advice from a guy who has 7121 hours behind the lens of a camera. Tomorrow I am going to log another 6 hours. Happy shooting everyone.

1 Comment

Citrus Balloon Festival Santa Paula

7/30/2011

0 Comments

 
Spend the morning at the Citrus Balloon Festival in Santa Paula, CA today. I was hoping to get some sick time-lapse of the 20 some balloons launching into flight. That didn't happen. Weather was a bit to foggy and when it cleared it was too late to launch the balloons. This dampened my mood which was already dampened by the SPPD that scolded me for riding my bike on the wrong side of the road even thought it was the right side. He pointed out that I should be on the other side of the road behind the pedestrian barricades that where specially set up for the event. How the hell I am supposed to know to ride my bike on the incorrect side of the road with the people who are walking?!. Anyway I would have totally let it go except he was talking to me like I was an 8 year old for the first time on a bike. Where is it in the law that states that just because you are a policeman, you have to be an angry jerk too (especially at an event that people are going to have fun at?). Any who, the photo ops where basically a bust. I got a few shots for documentary purposes, but nothing that I am total psyched on.  Better luck next year Norlander.
Picture
0 Comments

One Little Gripe

7/25/2011

2 Comments

 
Ok, ok, I have one little gripe. What is it? Well...let me tell you a little story first. I love to go thrift store shopping. Love it. I love looking around at the junk, the discarded wares, the treasure that I might find, but most importantly I love the deals that I can get on the aforementioned trash-to-treasure.  Not too long ago, I was meandering around a rather large thrift store in the San Fernando Valley. They had a great variety of items from an old traveling trunk that would make a great prop or coffee table to some funky lounge chairs that I wanted to take home. So between the crocheted pot holders and the excess picture frames with out glass, you can find some gems. My favorite items to pick up at the thrift stores is old cameras. Yep, old cameras. You know the kind - the kind that you can't buy film for in the brick and mortar stores anymore. 110, 160, 8mm, super 8, color slide...well you get the picture. Heck, I'll even look at some old 35mm SLR's just for fun. So...you are saying...what in the world is your little gripe? I am glad that you brought it up again because I nearly forgot. Here is my gripe: thrift store trash that is priced like treasure. Yep...those friends of the needy, mecca to the spend thrift, those non-profits who get their inventory from people cleaning out their cellars, attics and storage spaces are crankin' up the prices. Arrgh!!! Me no likey! Now that mustard yellow stripped, sack clothed, sunflower patterned easy chair is no longer $15, but a whopping $45! That is some serious inflation if you did the math (sorry, I am not going to do it). Translate that into 'vintage' camera gear and you a formula for 'sit-on-the-shelf-eyetis".  So this one particular "thrift" store had a price on a 15 year old 35mm film Nikon camera of $900. I just about lost it. Sure, it may have cost 10K when it was new, but seriously, tell me who is going to buy a camera at a thrift store for 900 bones? No say I. I am the wise of head and thin of wallet. So there you have it....in black and white...my little gripe out in the open for all to see. Are you with me on this one?  (BTW, below is a picture of some cameras that I WAS able to get a good deal on!)
Picture
2 Comments

Scary Dairy

7/23/2011

0 Comments

 
Went down to Camarillo today to check out the Scary Dairy. Rumor has it that this place was a dairy farm that supplied the Camarillo State Mental Hospital from the 1930's to the 1960's. Its abandoned now, but more rumors state that patients where taken out there and tortured and possibly killed. More unsubstantiated rumors are that there where experiments on cattle and possibly humans. Of course if you go there at night you'll see ghosts or maybe you'll just run into a gang member or a tagger. When I was there today, I swear I heard a cow mooing. There are no cows within miles of the area now. Ghost cows, now that is a scary movie! If you want to check out my pictures from the place, you can see them on my flickr photostream. 
Link to Scary Dairy
0 Comments

Get Me the 2" Needle

7/22/2011

0 Comments

 
On Wednesday of this week I spent a little time in the afternoon with my friend Tommy Hollenstein. Tommy and I are working on a documentary together about his life and artwork. For those who don't know, Tommy had a biking accident in 1985 and had a spinal cord injury that left him paralyzed from the neck down. Tommy asked me to join him for a doctors visit to film for the documentary. The visit was for treatments to his muscles to help ease the pain of a recent car accident (Tommy doesn't drive and it was the other drivers fault by the way).  I wasn't sure what I was in for.  Well, I prepared my cameras and off I went to meet Tommy at the doctors office. Basically the doctors plan was to inject dextrose into the muscle to help relax the muscle and realign it to the bone, this takes injections, lots and lots of injections. Injections with large scary needles that can be as longer or maybe longer than 2 inches. We waited for the doctor for a while and Tommy was getting antsy because he is not too excited about getting these injections and wanted to get it over with. Soon, the doctor came in and started poking Tommy in the neck with these big needles (after asking him where it hurts of course). "Get me the 2" needle" he said. He needed to get deep into the tissueThe doctor was pretty gentle, but when it was all over, we counted about 80 needle sticks in all....for that day, Tommy was a human pin cushion.  The footage is great and will fit nicely into the documentary. Stay tuned!!
0 Comments

First Post!

7/22/2011

1 Comment

 
Start blogging by creating a new post. You can edit or delete me by clicking under the comments. You can also customize your sidebar by dragging in elements from the top bar.
1 Comment
Forward>>

    Author

    Write something about yourself. No need to be fancy, just an overview.

    Archives

    September 2017
    May 2014
    February 2014
    November 2013
    October 2013
    September 2013
    August 2013
    October 2012
    January 2012
    December 2011
    August 2011
    July 2011

    Categories

    All
    38 Years
    7d
    7 Things Beginning Photographers Should Do
    Burro Schmidt
    California
    California State University
    Camarillo
    Canon
    Channel Islands
    Cheap
    Citrus Balloon Festival
    Events
    Fun
    Gold Mining
    Goodwill
    Holly Ash Mine
    Hot Air Balloon
    Injections
    Low Prices
    Mojave
    Needles
    New Photographer
    Pain
    Photography
    Quadriplegic
    Red Rock
    Salvation Army
    Santa Paula
    Scary Dairy
    Spend Thrift
    Spendy
    Sppd
    Starting Out
    State Hospital
    State Park
    Thrift Stores
    Time-lapse
    Treatment
    Walt Bickel
    Wheelchair

    RSS Feed

Powered by Create your own unique website with customizable templates.